My experiences after experimenting with homemade pizza.

About a year ago, I decided to try to make pizza at home that mimics the pizzeria's fantastic creations as much as possible. A lot was about curiosity about how it works and the desire to learn something new, but a bit it was about the fact that I was simply hungry for pizza at the time. :)
I tried a few different recipes I found online and there are a lot to choose from. Most gave a good result, but still lacked that little extra that I was looking for. What I noticed was that many recipes contained many ingredients (eg sugar, oil and baking powder) that could give a slightly different taste and texture to the pizza compared to the pizzerias. A lot had to do with the fact that the dough should work in a very hot oven as a real pizza oven comes up at much higher temperatures than a regular home oven. Sugar and a certain type of oil could then give the dough a burnt taste.
It was not until I tested Neapolitan dough that things started to fall into place. That and maximizing the oven as much as possible in combination with a pizza steel finally gave a result that comes close to the pizzeria's pizzas.
The dough
Neapolitan pizza dough is actually very simple and I think that is precisely the reason why it is so good. It consists only of water, yeast, salt and flour. However, the choice of ingredients and how the dough is handled is a bit more important and after using ´Tipo "00" flour ´ so I will not use anything else for pizza dough. The salt used should also be of a finely ground type which does not contain any additional additives. I used e.g. rock salt at some point and I felt like the dough behaved slightly differently.
 All ingredients
´Tipo "00" flour´ has been a bit difficult to get hold of, but today there are some varieties available in most major Swedish grocery stores. I have used ´Tipo "00" mjöl´ from Ramlösa Kvarn with good results and it is relatively easy to get hold of in southern Sweden.
The recipe I use for this dough is:
- 330 g Water
- 7 g Dry Yeast
- 15 g Salt
- 500 g ´Tipo "00" Flour´
I have deliberately omitted measurements in volume from that recipe as it is important to weigh all the ingredients (especially the flour). By using weight instead of volume, you ensure that the dough is exactly as it is referred to in the recipe and also that it becomes identical every time you make it. Whenever I bake something, I measure the ingredients by weighing them. In Sweden, you often buy dry yeast in packages that weigh 14 grams, so half a package is what applies there. If you use fresh yeast instead, the same applies - half a package, which corresponds to 25 grams of fresh yeast (they are sold in small packages of 50 grams each).
Fermentation
Another thing I think is important is to give the dough plenty of time to rise. It is possible to let the dough first rise for an hour or two and then shape the dough balls, but it is best if you leave the dough in the fridge overnight.
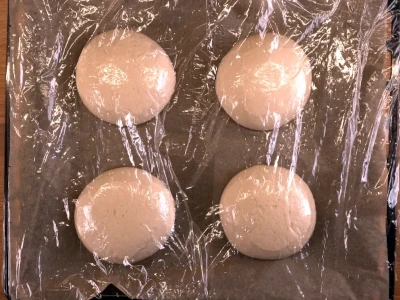
 Dough balls ready to use for pizza
It may be a bit time consuming, but at the same time it is not a lot of work that is needed - just planning. So what I usually do is combine water (preferably finger-warm) and dry yeast in a household assistant with a dough hook or similar. These 2 ingredients get 10 minutes together and then I start the machine and add salt and flour. The machine then kneads the dough for 5-10 minutes. Then I pick remove the dough and place it in a lightly oiled container, which can then be left in the fridge overnight. The container should be airtight and quite large as the dough will expand significantly.
The next day I pick out the dough, divide it into 4 equal parts and shape each part into a ball. You may need to practice this a bit so that you do not create any kind of cavity in the ball, which may make it more problematic to shape the dough later. You should be restrictive with the amount of flour you use here. Then I lightly oil the balls and place them on a baking sheet covered with parchment paper which is then covered with plastic wrap. From this point, the dough can be stored in the refrigerator for quite a few hours.
About half an hour before it's time to bake the pizza, I take the dough balls out of the fridge so they come up to room temperature. Whether you should do this or not, you have to experiment yourself. Then I shape a pizza base where I use a lot of flour, put on the toppings I want and bake the pizza in the oven.
Cooking
It is difficult for an ordinary home oven to reach the temperatures that a real pizza oven maintains. It is not uncommon for a pizza oven to be up to 450°C and many home ovens rarely exceed 300°C.

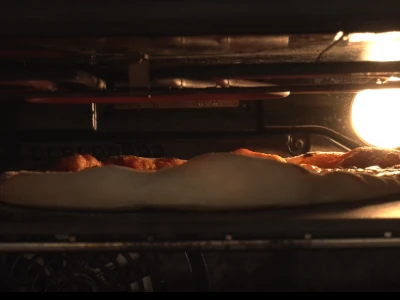
What you can do, however, is to combine the grill element that is in the oven's roof with a pizza steel that is heated in the oven for an hour. In this way, you create a small opening along the top of the oven where you can put your pizza in and it is as hot as you can achieve in an ordinary oven. I have also tried to use pizza stone, which is ok, but pizza steel is more durable so you do not have to be afraid that it will crack due to sudden temperature changes. My oven comes at a maximum of 285 degrees with the grill element and that is enough to give a perfectly ok pizza.
There are ovens that are specially made for pizza that are sold for home use. One such type is "Ooni" which comes up in higher temperatures than the normal home oven. However, it costs a little so you have to take that into account. If you are really professional, you build your own wood-fired oven in the garden - clearly a premium, but it can be a fun project as well.

This dough not only works well for Neapolitan pizza but I use it (plus some oil) for pan pizza as well. When I make pan pizza, I choose a lower temperature (250°C) and do not use the grill element. Baking the pizza in a cast iron pan then takes almost 25 minutes, but it gives very good results and you can throw on quite a lot of toppings.
This can be a first option if you want to try the dough before making investments in pizza steel and pizza spade. Or just do it sometimes to get some variety. The dough then gets 2 fermentations where the last takes place in a well-oiled cast iron pan for at least 2 hours. This makes the finished pizza relatively airy and gives it something a little extra. The dough will be quite hearty, but that's exactly what you're looking for in a pan pizza.

Another alternative before making expensive investments is to use an ovenproof frying pan that you heat up on the hob where you place your dough. In the frying pan, you then add tomato sauce, cheese and the toppings you want to then put the whole frying pan in the oven under the grill element. It actually works really well. You just have to keep in mind that the handle of the frying pan gets very hot and that the frying pan fits in the oven. You may be able to heat the frying pan between the pizzas so it may take a little longer, but it is definitely worth trying.
I have used cast iron pans and stainless steel for this and think they work just as well. I have a fairly large stainless steel pan that fits perfectly in the oven. In smaller frying pans, you may need to fold up the dough a little on the edges, but I do not think that matters. A homemade pizza does not have to be absolutely perfect, it just has to be good. :)
For some more detailed instructions and a short video, checkout the recipe "Neapolitan pizza" on this site.


